Wednesday, April 18, 2012

Epic Titans!!! And a well known titan-weapon from the Internets...

So, here's a litte rant regarding my latest side project (aka '40K-progress derailer' hahaha), the rebuilding of a few old Epic miniatures. For those of you that are unaware, Epic is essentially Warhammer 40,000 but in 6mm scale- thats right, a single infantryman is 6mm tall, compared to the 25-28 mm of 40K. Entire squads are stuck onto single square or rectangular bases, and move, shoot and assualt all as the one entity. Combat on this scale also lends itself to the use of massive armour columns, superheavy tanks as well as my favourite- the Titans. These walking monsters can decimate opposing armies in shooting and close combat, and are such an iconic image that I have collected a few across the years. The hardest part, to be honest, is actually finding someone to have a game of Epic with, although I've found recently that Canberra has a very decent sized Epic fanbase so here's hoping i'll get some games in soon!

My old Dark Angels Epic army was essentially what came straight out of the "Epic:40,000" box set (from 1997), with the addition of 4 metal Dreadnoughts and a very recently purchased metal Thunderhawk gunship. However, as is the way of things, I decided to change their colourscheme and chapter orientation- so they've now taken a bath into the Simple Green, and have been there for around two weeks now. Initial cleanup on a few units has been extremely promising- the paint comes off with minimal scrubbing with a light toothbrush and some running water, and my earlier fears regarding infantry snapping off at the legs during cleanup appears unfounded- it simply doesnt happen. So, with my recent purchases of 40 1988-era 'Space Marine" tactical marines and the cleaned up ones from my prior DA army i'll soon have a large assembled army ready for undercoat and paint. Takes roughly 10 minutes per base to paint up if you really, really take your time, including highlights- thats how tiny they are!

A selection of Titans, for your viewing pleasure... 
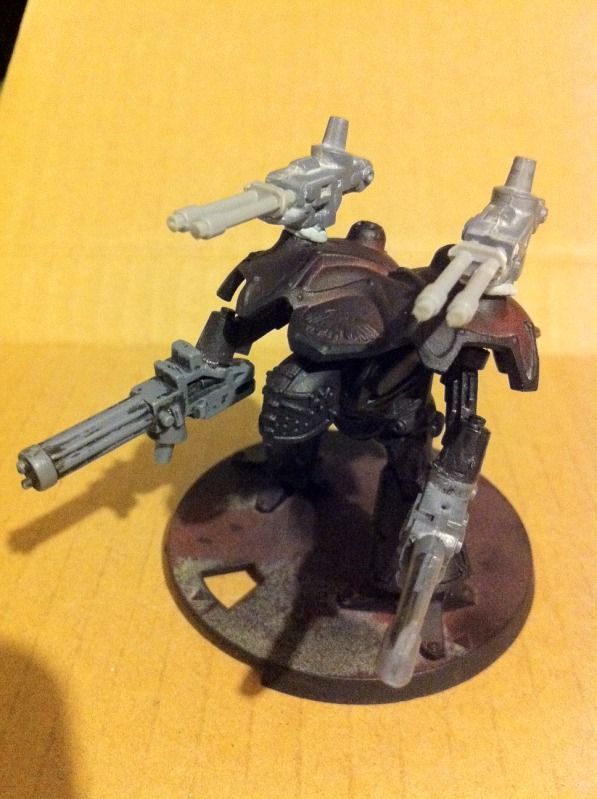
MARS-PATTERN WARLORD

Here's another work in progress- this Warlord Titan was purchased along with another two around five years prior,  they've had multiple cleanup sessions to get all the old Enamel paint off (takes a lot longer in Simple Green, but most things that dissolve Enamel arent good for plastic either), and this one has now been re-undercoated and the arms and guns have been glued solidly onto the carapace. What i've been going for is a build for a 'standard' Warlord under the GW Epic: Armageddon rules (the latest version), and my others will have mix 'n' match loadouts for games using the Net EA rules. So, this guy is rocking the 1988 weapon equivalents of a  gatling blaster and volcano cannon, however i decided his pointy short 'defence lasers' on the carapace did not look like the double-barrelled twin turbolaser destructors they were meant to be. So, with a lot of care and a bit of luck I cut off the existing barrels, and then chopped up a twin barrel setup for both guns- these are made from a Tau burst cannon, and look fantastic in my opinion!! They arent glued in place as yet, i'm going to paint the carapace up before they are permanently attached.  I'll also be removing the multi-fit mounting lugs under/on top of all guns where they arent needed anymore.  
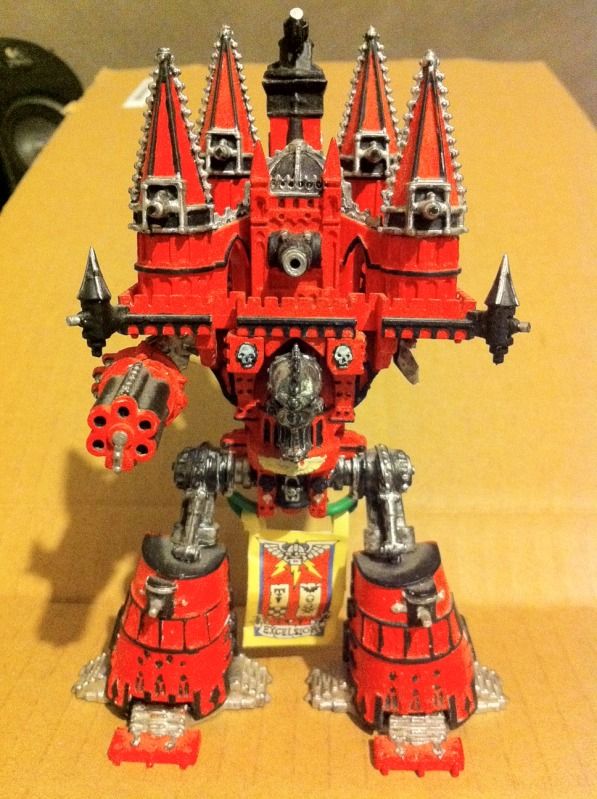
 IMPERATOR

And here's a mini i've had for a long time- the biggest and baddest of the Emperor's land-based weapons- the Emperor Class 'Imperator' Titan. I originally bought him from a friend unassembled, and i threw him together in a single night and then spent only a few hours painting him up- suffice to say its a claggy, thick and nasty job (but hey, i was young and stupid...). Also, along the way I decided that Epic wasnt for me, and the Imperator donated his Plasma Annihilator to one of my Dark Angels Dreadnoughts, cut down shorter (and thus, never  reclaimable for Epic...). With my recent 'repaint and rebuild' bent I decided the Imperator needed a complete rebuild, and to this end I would need a replacement Plasma Annihilator. I ended up sourcing one through eBay, but thought there was something very familiar about it.. turns out, the actual PA I bought is the one used in the Warhammer 40K Online Wiki... Seriously- if you Google Image Search "Plasma Annihilator", the first image that comes up is a claggy thick painted red/silver poor excuse for a titan weapon- that exact gun is sitting on my desk at home waiting for a dip into the greenstuff... yay, quasi-famous weapon for my titan.... hahahaha!
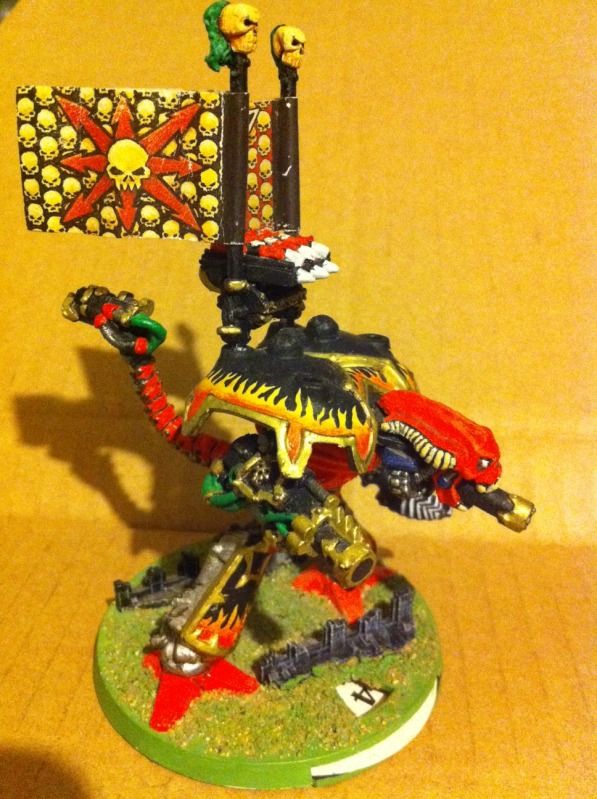
BANELORD

And just for some completeness, and to make this less of an Imperium-fest, here's my Khorne Banelord Titan- essentially a close combat/short range Warlord, it uses metal arm weapons, metal head (with a minigun coming out of the mouth!!!), metal tail and metal missile rack and banner poles! But, its the same plastic warlord chassis as the other ones, im always impressed at how much variation could be acheived with some 'add ons'. Hoping to get a small Chaos warband assembled and painted soon (I have the minis), and then get some games in as well...


WARHOUND SCOUT TITAN
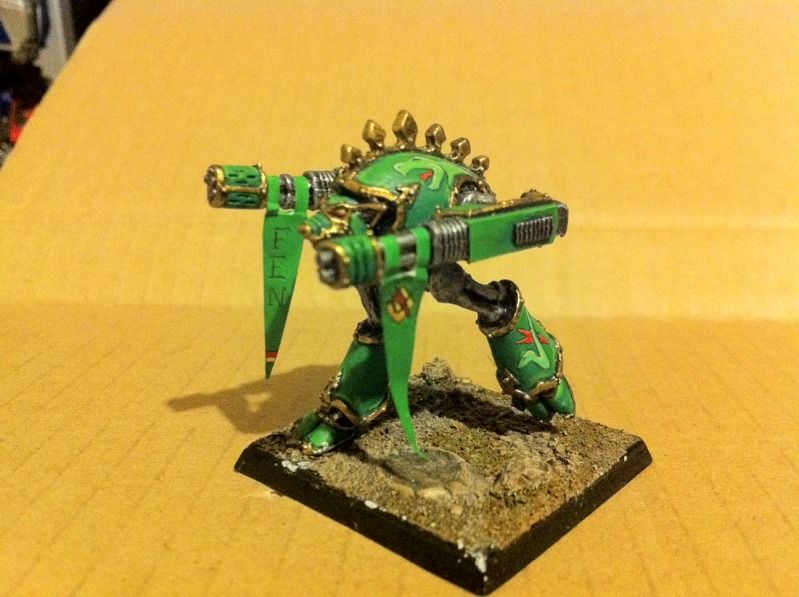
This little fella is the smallest Titan type available, I purchased him on eBay with another matching one (Warhounds can operate in packs of two), both with these awesome freehand serpent iconography and handpainted banners. Unfortunately, in moving stuff around i've misplaced the other Warhound's leg (it'd fallen off), so i'm temporarily down to one until it resurfaces. They both have the original style 40mm square base- later ones have round 40K Terminator-sized bases. If push comes to shove i'll source another leg online and paintmatch it to the original scheme...   


Possible delay with next post??

Thought I'd also mention that this may be my last post for a little while, as my wife is due to give birth in less than two weeks time- meaning the baby could come along at any point from now! This means i'll most likely be spending a lot of my free time getting last minute things in order and wrapping up/ handing over things at work for my 5 or so weeks off work. But, who knows, my time off may allow me a bit more freedom to get some hobby work and blog updates done (in between nappy changes :P).

Anyhow, i'll be back, sooner or later.

Tempest!

Monday, April 9, 2012

Simple Green vs 'Simple Orange'

Thought i'd post up a quick one today, concerning the product 'Simple Green' as used by a lot of wargamers for paintstripping. 

I've previously been able to get hold of the dark green coloured concentrate at Bunnings (my local hardware store), and had found it to be extremely potent at removing years worth of paint- thick, thin, undercoated or no- it all came off with some time submerged in it. In no way did it affect plastics, and didnt even un-stick previously superglued parts- its extremely good at what it does.

However after I finished my last bottle I found that Bunnings had stopped stocking the dark green concentrate, and all I could find was a bright orange concentrate instead, which is easier to see through and has a orangey/citrus smell to it. After some google searching I couldnt find any real evidence either way to say if it was the same thing as the green concentrate, or even as potent/unharming to plastics.

So, with a bottle of newly purchased "Simple Orange" I threw my old Azrael mini in as well as a surplus plastic space marine, and waited for two days. And the results? After a quick high-pressure blast from the garden hose all the paint is gone from both minis!

So, there is absolutely no difference from the dark green stuff in regards to performance and treatment of plastics. And even better, you can see right into the concentrate to view submerged minis (check paint stripping progress) whereas the old dark green stuff would obscure your view. So, win win!

For anyone looking for this stuff, its bright orange, and comes with a spray bottle shring-wrapped beside the main 2L concentrate in a 'pack', for $20AU. Cannot recommend highly enough. Also, to allay any fears people may have, ignore the 'dont use on plastic trim' comment on the bottle- doesnt apply to the plastic used in miniatures!

So to round this post off, here's some of my tips for using simple green/orange/whatever..
  •  Use a cheap plastic see-through food container with a snap on lid. If left open to the air the SG will evaporate over time, as well as lose its colour and turn clear like water. Not sure if this changes its paintstripping abilities though. When enclosed it will holds its colour and level almost indefinately.
  • Blast minis under a tap or garden hose to remove paint (within reason- delicate stuff would be better lightly scrubbed with a toothbrush), then dunk in fresh water for a while. Remove later and let dry in the sun.
  • For really thick paintjobs its best to scrub whatever you can get off with a medium stiffness toothbrush then drop the mini back in. My Warlord Titans took three extended baths to get the paint off, although this was mainly due to them having enamel paintjobs- SG is better suited to water-based acrylics, but most solvents that are good for enamels are no good for plastic.
Until next time,
Tempest       

Thursday, March 29, 2012

Persistence pays off

Welcome back for another update!

I've been steadily plugging away at both my Deathskulls and Dark Angels for the last couple of weeks, getting between half and hour and three hours painting in most evenings, and its really paying dividends. I've now got 10 Boyz painted up to a nice standard (see previous posts), and have completed all the basic green power armour on my two Tactical squads and one Devastator squad. Its hard to see at the start of a painting task exactly how you will make it to the end- the job in front of you can look insurmountable, but with discipline any job can be completed. And so it is with all these previously untouched minis that they are now starting to come along really well!

So for the Orks thats 10 from 60 boyz done- exactly 1/6th, or a third of a full mob. Its taken a bit longer than expected, as I think my initial "45 mins to an hour" projection per boy was at the very least highly optimistic. The extended paint time come from me now using four different browns for the clothing and straps and three washes for the skin, being Devlan and Gryphonne all over, then Badab applied into the deepest recesses of the face and arm muscles. I couldnt be happier with the result I have a really good rich green skin tone going on, the colours all over the orks interact well and they all have random armour plating damage and checks/dags in blue and white. And, to be honest i'm getting quicker at painting, and finding new techniques and colour/wash combos that speed things up. The three boys in the picture above are part of the first batch of ten (which includes a nob and big shoota boy)

Just to show you how overkill I've gone, here's the selection of paints i'm using for the boyz mob (and will use on the rest of the army as well), and I'm even missing Gryphonne Sepia from the shot as well.... so its easily 20+ colours, but im 'only' (ha!) using about 12-13 per mini so they maintain a random colouring.

Speaking of which, im enjoying the yellows, reds, oranges and other 'spot' colours that draw the eye, they contrast nicely with the blue/white panoply on the rest of the armour, and realyl brings out that "looted" look to show that the lads will steal anything that isnt nailed down! Hoping to go a bit further with the Kans, Vehicles and the Stompa, with some partial Imperial insignia showing on larger plates of sheet metal to show that they've been looted to effect battle repairs.

Will try to get some progress pics up of the Dark Angel Squads, although they still aren't much to look at just yet- dark green and  black power armoured marines!

Next up: things are going to get a little bit 'Epic'!! Yep, we are going to go small small small scale!

Until then, cheers!
Tempest :) 

Tuesday, March 13, 2012

Abbadon: The Resurrection, and Ork Boyz paint scheme

Abbadon Returns!

Prior to our last weekend's 4K per side stoush at Adam's place I was required to remove Abbadon from the murky green bath of Simple Green concentrate that he's been living in for a while now, so that Ash could use him to lead his army. With him pulled out it could be seen that his old paintjob was lifting off everywhere, just what we want! I then placed him in a rigid plastic container, grabbed my garden hose and set the nozzle to 'jet'- a really sharp narrow high pressure stream of water (can bruise skin at close range), and blasted the Despoiler for about a minute. I think the following picture shows the results best- back to base metal :)


The slight "grey textured" look was just discolouration of the metal, its all smooth and even and hadn't done anything to the details at all. I then submerged Abbadon in a jar of straight tap water for an hour, emptied it and then gave him another hit with the jet. This wasnt to remove any more paint- it was already completely gone- but to remove any remaining traces of Simple Green. With this concluded i left him out in the sun for an hour, then brought him inside and reassembled him and when he was at room temp I re-undercoated him with 3 nice thin coats of Chaos Black undercoat spray. He then hit the tabletop the very next day and celebrated by carving his way through numerous Imperial Guard and Space Wolves squads and even destroyed a Land Raider Redeemer. Bat rep coming on that one really soon!

So in summary I'm very happy with how well he came up, Pedro Kantor is next on the cleanup list and should return the same results- his paint appears even more loose, I think the majority will just peel off all in one go!

Waaaagh!!! Paintjob now decided for the boyz
Sat down last night with the normal tuesday night animated show marathon on 7 Mate and decided to pull my finger out and work out a scheme for the 60 Ork boys I have. As always, this was preceded by a huge amount of google searching to see what others have done, what colour combos work and what id need to buy. Thankfully I was able to settle on a scheme that I have all the paints for, looks good and is easy to paint (within reason- I do tend to make things hard for myself). So behold, a not-so-good photo of what I came up with (i'll try to get a better pic later), this is actually a lot darker than the mini looks- all the colours are muted looking where in real life they are lot richer.


The main basis for the scheme is several differing shades of brown for the fatigues, pants, boots and straps that hold the armour on. The armour plating, guns, choppa blade and haft, rivets, buckles and boot toecaps are all boltgun metal. And the skin is Knarloc Green with a liberal Thraka Green wash, with a Devlan mud wash in the deepest arm muscle and face features recesses, then Knarloc Green reapplied on the raised areas and a final thinned highlight of camo green.

Everything gets a Devlan mud wash to shade and tie the colours together, especially the creases on the pants. A great tip to remember when using large all over thick washes is to hang the model upside down, this way the washes pool up "under" the areas that should be shadowed naturally. I then go back over most of the areas that i've washed and reapply the base colour again on the most raised sections, and a thin highlight if appropriate.


The boyz will also have a bit of battle-damage on their armour plating as can be seen in the picture, with the blue/white paint giving way to a black undercoat which then gives way to the bare metal underneath- this is best represented on the choppa. I also gave the choppa blade some dried blood on its edge, this is just very watered down dark flesh applied in a random fashion.

The spot colours for the boyz will be randomly applied red, orange, purple, bright green here and there- hair, gun pieces, wrist or arm bandages, straps, belts or whatnot. Im also looking to add some fluffy flavour- pieces of armour, clothing or weaponry lifted from other clans, primarily the Evil Sunz, Blood Axes or Bad Moons, due to the different colours and patterns they have. I'm not going to bother with anything looted from the Goffs- i've got enough white checked stuff in my army already, and anything with black and white checks is mainly just going to look like I've left something unfinished!!

This initial paintup took about 1.5 hours when you factor out the drying time for the two washes, including umming and ahhing about what colours to use. Im fairly hopeful that the next bunch of boyz will only take 45 minutes to an hour tops to get to the same standard now that all the hard decisions have been made.        

So, I'm done for now- hope you liked this small update!

Cheers,
Tempest  

Monday, March 5, 2012

Modular Table update, and Burna Spam (mmm, spam...)

Table update!

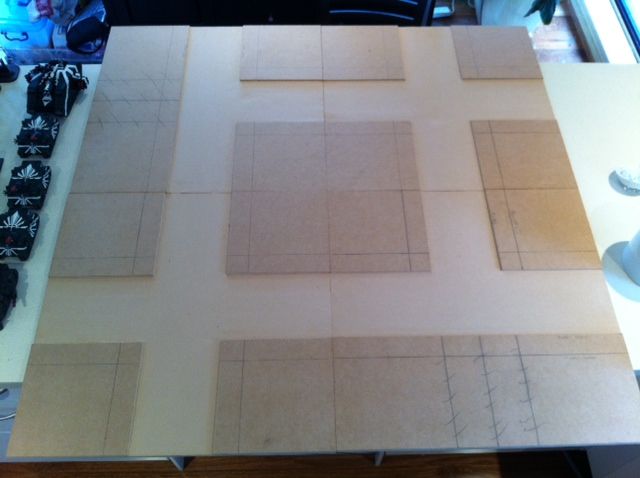
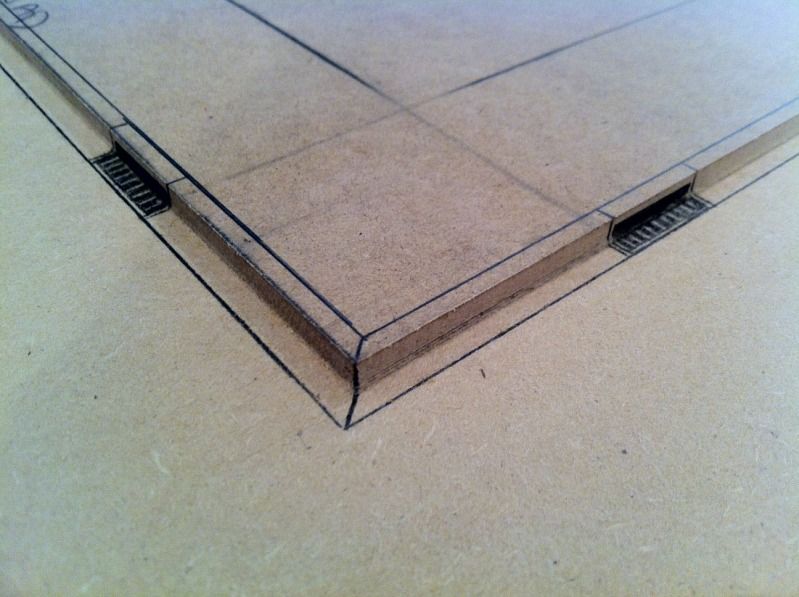
Just a quick update today to show the fruit of my labours, there is now 4 completed CoD boards all routed out and looking pretty. I've also decided that the level of detail on these boards should be fairly high, and to this end i've designed a simple 'gutters and drains' design to be drawn onto the boards with a Sharpie (ballpoint permanent marker), it really makes it look like a proper roadside edging!! Once the boards have been appropriately painted up (washed out grey over an undercoat of dirty red brown?) these will be drawn on. As my eventual plan is to spray the whole table assembly with a matte varnish they wont be wearing off in a hurry. This also makes me very keen to do some road markings as well for even more detail..


I've also had thoughts of sinking some fully or partially recessed pipes into some of the boards, running parralel to the road, to represent gas or power lines. I'd possible build some small relay boxes or metering valves positioned somewhere on the pipe (at one end maybe), giving yet more depth to the boards. As the boards are 16mm thick thats a lot to play with, and i'm going to integrate anything else I can think of that provides depth and flavour without being too overkill.

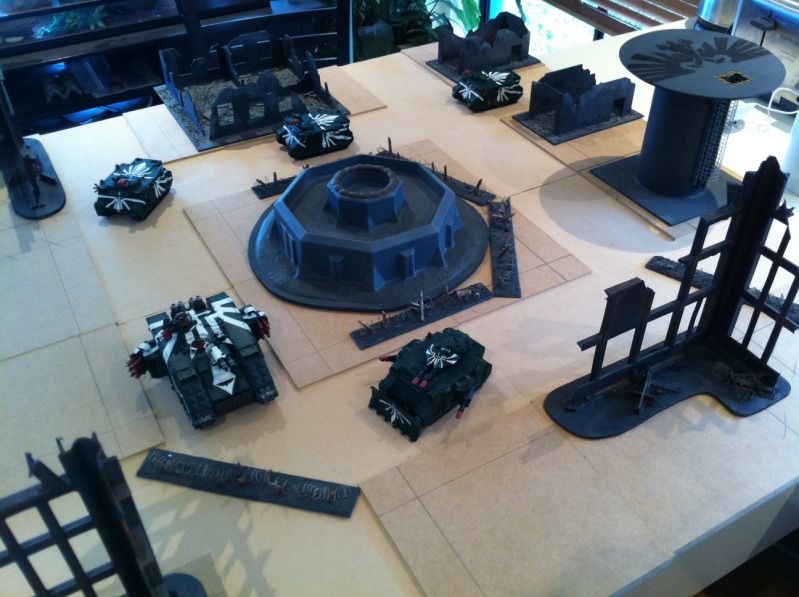
Here's some of my nicer terrain on the 4 routed boards to show the size and how it will work...


I've purchased and cut up another 4x2 board as well, but have run out of time for routing. Shouldnt be too long though and there'll be a full 6x4 board assembly ready to go!

More Orks! Burnas by the gutload....

So after my recent acquisition of a box of Lootas/Burnas I came to the realisation that my other recent purchases and chosen list build (Deathskull-fluffy Mekboy /Kan Wall) has filled all the Heavy Support slots with Killa Kans. So, in this instance the Lootas wouldnt have a home in my list for a while, being that the Kan Wall is still being tested out. However this did open up the prospect of running some Elite units, and this is why the Burna Boys were chosen as my next little mini project. So after a few more judicious pruchases on eBay i'm now the proud owner of 14 Burnas and a Mek with KMB!! Will eventually be 15, but I need to turn up another single Burna to purchase.

I'm hoping to use the boyz in a fairly bare bones open topped Battlewagon, and having read the rules for firing from open topped transports I can say that this unit is going to be one scary proposition- roll up on a target squad, and the flamer template can be shot out from any point on the hull. Not only that, but all shooting/templates can originate from the same point. What this means is that if I can cover the target unit with the flamer and get 6 hits, I then multiply that directly by the number of burnas I have. With a full 15 Burnas thats 90 hits at Strength 4!! I now know why people rate Burnas so highly, although I'm fully aware that like most specialised Ork units its a case of getting them into the right place at the right time- transports are a must  Im also very keen to see how they fare against tougher opponents using their 'cuttin flame' burna nozzles (power weapons), a full mob on the charge with WS 4 Strength 4 and dealing out 45 attacks will carve a lot of tough opponents up.

And the other reason why i'm doing a full sized mob of burnas? They look so cool! The gasmask heads, the fuel tanks and other paraphernalia, as well as the very Deathskull-esque ties that Burnas/Meks have from the fluff perspective, it all adds up to make for a great looking addition to my army. I'm hoping that my opponent will be distracted by all the other scary units in my army that i'll be able to get them and their Battlewagon across the table and within template range to deal some damage!

I'll get some pictures up once they are all assembled, hopefully sometime this week, as there's a game on with some mates this weekend.

Cheers,
Tempest 

Tuesday, February 28, 2012

Modular Cities of Death game board, new name and layout, and 1000 views!

Welcome back!! There's been a few changes round here, most markedly the blog name change. I decided on Tempest's 40K Bunker as the old name seemed a bit too focussed on terrain and minis, whereas I wanted to encompass the entire hobby itself. A small change, but I feel its an important one. I'm also going to play around with the layout and colours as well, so dont be surprised if its all changed when you next come back! 

Cities Of Death "Modular" game board.

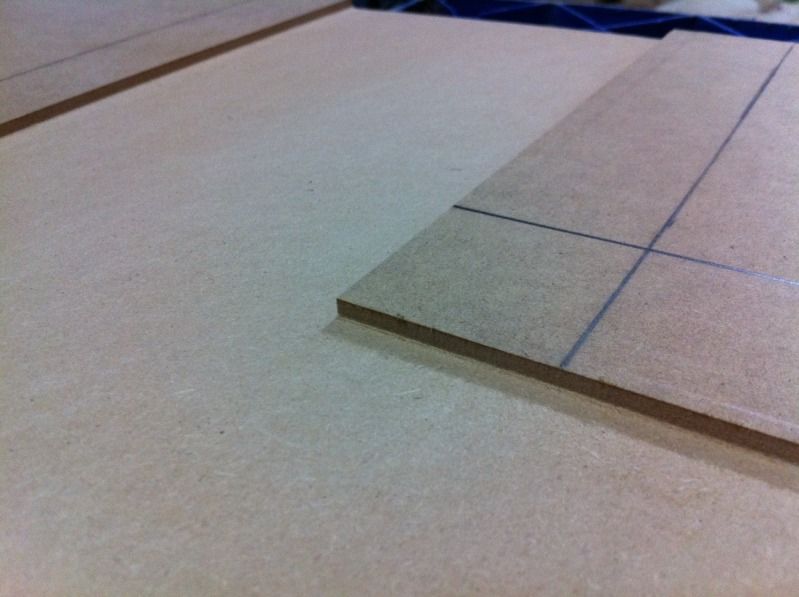
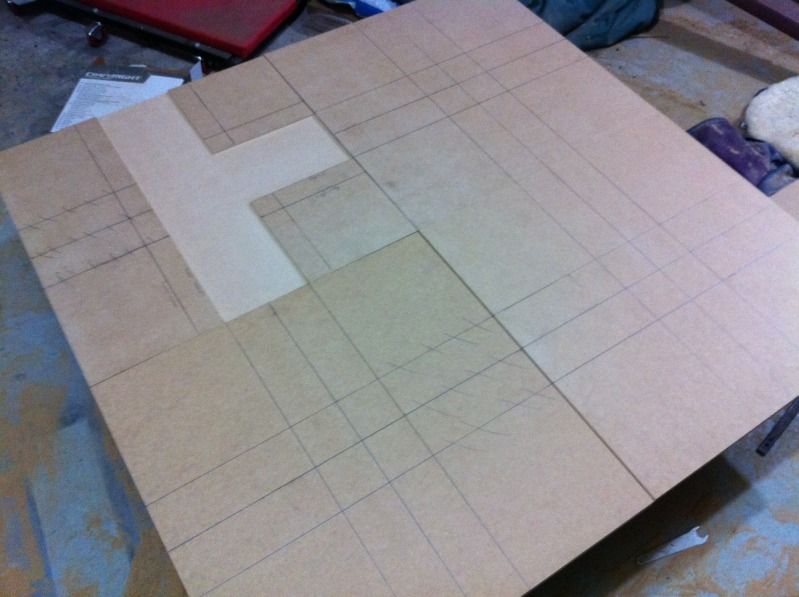
I've started work on a new and somewhat ambitious project, a fully modular gaming table for use in Cities of Death 40K battles, which is formed from 2ft x2ft MDF wood sections. I was initially quite hesitant about this project as I thought it would be hard to cut perfectly sized squares, however a trip to the hardware store (Bunnings) alleviated some anxiety when I found that I could buy 2x4ft sections, so only one cut per board to make each section. I actually found one of the 4x2 boards was a few mm longer than 4ft, this actually made for perfect 2ft squares after cutting when taking into account the width of the circular saw blade- the other 2 boards are both 1mm narrower across one direction. In the end it'll amount to nothing, but at least i know to search for slightly longer sections when i get my next board.

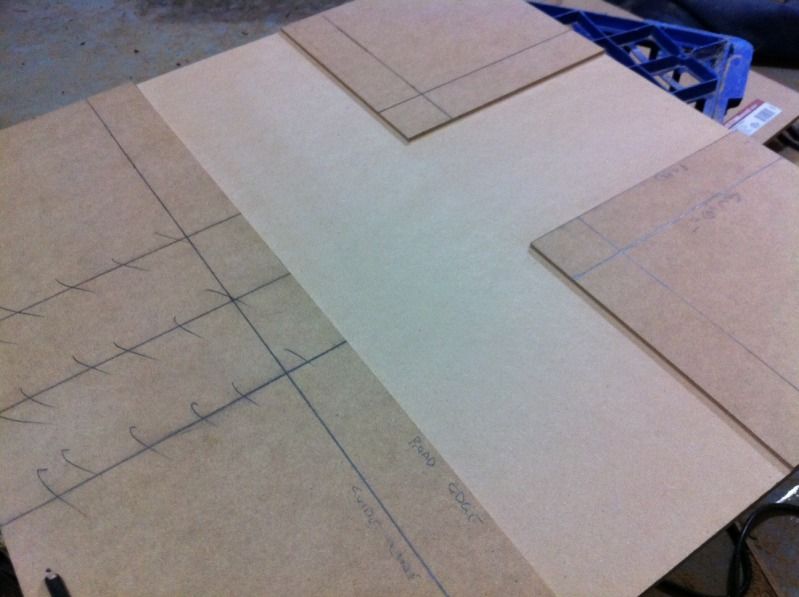
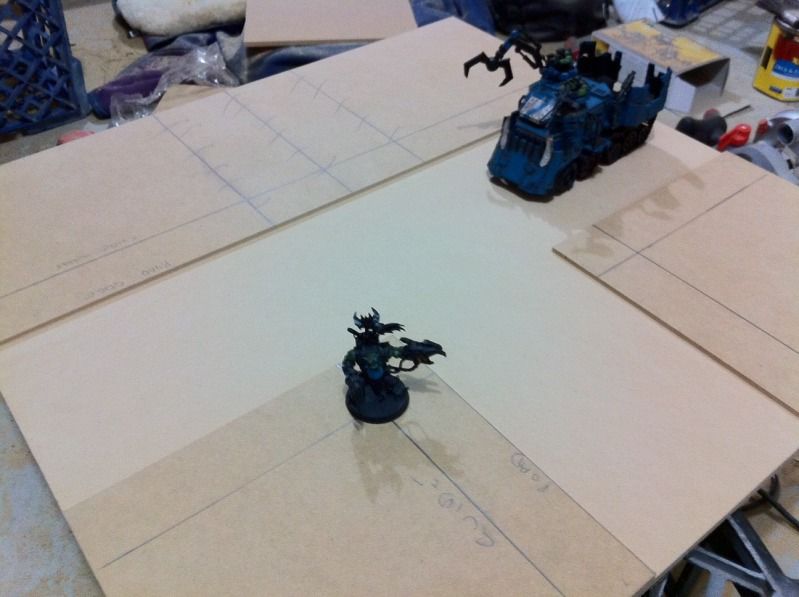
I marked out some roadways on the squares, 6 inches wide and entering/ exiting at the middle of each edge. For now I only have four squares, and have planned for two T intersections and two crossroads, the next two squares will have straight sections of road.
The roads themselves are carved into the squares using a handheld wood router with a 19mm square/flat cut router bit. I had to make up a wooden router guide to run this along, and after routing out each length of road I undo all the clamps and shift it about 17mm and go again for another pass. Tedious, but three-dimensional recessed roads are pretty sweet! The roads are about 4 mm lower than the top surface, so there's still 11mm of wooden board left to keep it all really solid, there's no chance of breaking the squares at all. Its basically the same height as a 40K round base.

Future plans are to add some much thinner (10- 15mm wide?) and much deeper lines here and there to represent water drainage channels. They'd terminate before each board edge, going 'underground', and would mainly be there to add some extra dimension. I'd also run them so they appear to flow under the roads as well, and am hoping to use water effects to get a good sense of realism. But for starters i'm going to concentrate on the roads and see how they all come out.

I've also decided that I'm not going to trash the streets with cracks and craters, I'd like this setup to work for both 'war-torn' and 'recently invaded' city scenarios, with craters and detritus being added on top later if necessary as seperate terrain pieces. Im definately going to do some more investigation into what kind of road lines or markings to paint down, but im not 100% sold on the idea just yet. If they are painted on i'll be drybrushing over them in spots to make them appear quite worn, giving a sense of age to the board. 

So for now at least I have one square completed, the others should be done by the weekend, as its been raining nearly non stop for a while now and I therefore have some free time to spend in the garage!


Over 1000 blog views!!

Wow, it hasnt taken that long to get this many page views, some of you must like me enough to come back for a look every now and then.  I really appreciate that people will spend time looking into my Blog, and I'm hopeful that I'm able to continue showcasing the kind of minis, terrain, tips, tutorials, battlereports and general info that interests people and hopefully inspires them in their own hobby endeavours.  I aspire to keep going with this Blog for as long as possible and keep working on the minis and terrain that inspire me so much. I appreciate your interest, and hope that I can continue to provide another perspective on the universe of 40K.  

Until next time, thanks for visiting.
Tempest :) 

Thursday, February 23, 2012

The "Kan Wall", BA SangGuard and some big-name repaints!

Hi all, welcome back! I've been relatively busy of late with house and baby-centric preparations (only 10 weeks to go!) so the hobby has been pushed back a little bit.  I've still been able to get a lot of things done though in the limited time available, namely trying out some NMM gold techniques on a squad of Sanguinary Guard, and assembling and lightly base colouring some Killa Kans. The former was due to a desire to try something I havent done before, the latter because I was hoping to  get a semi-competitive "Kan-Wall" list ready for a one-day tourney.

Here's how the Sang Guard are going... pretty happy for a first try!


So regarding the Orks- I got the Kanz glued together and undercoated in just one night, including removing all mold lines, flashing etc and then got their main hull/body sections coated in a single layer of hawk turquise to help them look less like flat-black flailing robots. I also undercoated and then painted the skin onto the Painboy and Grot orderly for my Nobz squad as well as the Big Mek with Kustom Force Field. Nobody wants to see bare metal, or just black undercoat. A small bit of effort always goes a long way.

I then ran the boyz at the local tourney (1400pts), and the first game demonstrated how hardcore a Kan-wall can be. Running two squads of 3x Kans,  two x 30-strong Boyz mobs and a Warboss, 9 Nobz + Painboy and Big Mek with KFF all in a Battlewagon I essentially steamrolled the Marine army in front of me. The only major losses I sustained were the Warboss and Nobz, who failed to get a charge in by a half-inch, and were then themselves assaulted by Lighting Claw- toting Terminators and a Captain. I eventually whittled these guys down with a mob of Boyz, dealing on average 60+ attacks per turn until they were gone- 2+ armour can be good if you dont need to take 9 saves per model! Aside from that, the only other significant loss was a single Killa Kan to an assault cannon shot, and this was after both Kan mobs had carved up a Landraider Redeemer into several smoking sections. They then went on to attack the Tactical Squads positioned at the back of the board, taking them down with grotzookas, missiles and then close combat. Here's some pics from the game:

Deployed and ready to roll!! Everyone has access to the KFF bubble at this point of the game :)


Waaagh!!! Kans carve the Landraider into ruin, the left Boyz mob swamps the terminators whilst the right ones rescue "Frosty Frostington" (the snowman) who was the main objective.


And in the final stages of turn 4, the Kans engage and massacre the Tactical Squads :)


The unfortunate thing was that I had to bail out and return home after this first game, so I'm not going to automatically assume that this is a dynamite killer list just yet. I will however admit that its the basis for a strong list, especially with another 350 points added on top to equal the 1750pt limit that is most commonly seen around the local tourneys. Im thinking that I'll be throwing in another 3 Kanz, and will therefore have 3 Grotzookas, 3 Rokkit Launchas and (if i can scrounge the parts) 3 Kustom Mega Blastas. I'll also be looking to add a Deff Dread with twin scorchas, mainly just to give the opposing forces something big and scary looking. Stat-wise and for its points, a Deff Dread is considered an underperforming unit, however I'd be looking to utilise it in the psychological 'big and scary' role for keeping my Kanz alive. With armour plates and grot riggers it should be able to keep rolling forwards attracting fire and keeping the other elements of my force unmolested. The last switch/addition i'd be taking is another KFF Mek, removing the Warboss from my list. This then opens up about 130 points to use, so I'd possibly get another Deff Dread. 11 Walkers, 60 Boyz, 9 Nobz (upgraded with more Pklaws), a battlewagon and 2 KFFs to cover the whole army?? I know why this type of list has a reputation...
       
*Update: I've now purchased another 3 Kanz, and a box of Lootas/Burnas- more green-death to come!* 


And now, switching back again to the painting side of things...

Following my recent discovery of the greatness that is Simple Green concentrate I have been diligently rescuing some of the old models in my posession from the captiprison of thick, claggy and decidedly unattractive paint. Some of these minis are mine, and some of them belong to my friends- I've taken it upon myself to help them with paintstripping, cleaning up and (where appropriate) repainting the figures. So far the roster of submerged minis reads like a roll call of some of the greatest and brightest in the 40K universe, comprising Abbadon the Despoiler, Pedro Kantor, Kharn the Betrayer, Azrael (and Helmet Bearer), Interrogator Chaplain Asmodai as well as another "mystery guest"...

My penchant for stripping and repainting minis came after a forum discussion last year on repainting vs stripping and starting over, with which I concluded that the best approach is to start over if the materials to do so were available and the current paintjob is too thick to be covered. A great example of repainting on here is my Terminator Chaplain (the guy in my avatar), who copped a light re-spray in Chaos Black undercoat before having everything painted over again. However, I think that he's the exception to the rule, as the existing paintjob needs to be relatively smooth and thin if you are going to attempt this.

Luckily I have been able to source concentrated Simple Green from my local hardware store, and have been able to get stuck into the process of rejuvenating some previously forgotten or unloved minis. The stripping process can take as little as a few days in the solution for one-coat thick paintjobs or a week or more if there is multiple thin coats and a good sprayed-on undercoat, which acts as an anchor for the paint above to grab to. I generally leave the minis in for a week minimum, and once the green colour starts to dissappear from the solution the minis come out, get washed and have all small remaining paint traces removed from the deeper crevices and edges with a dental pick (a pin head does a similar job).  However, 9 times out of 10 a quick blast under a tap on high pressure tends to remove everything anyways.

So here's a few pictures of the current luminaries awaiting their rebirth- these were photos from games that they've participated in over the last couple of years. Im hopeful that once repainted they'll be back onto the tabletop again to lead their power armoured cohorts to glory/infamy....

Pedro Kantor- the Chapter Master of the Imperial Fists was done up with different coloured eyes for some reason, which combined with the blue/white panoply seems to make him look like a clown. Im hoping to restore some dignity to this guy, and have some great plans surrounding his powerfist regarding some OSL work and some freehand stuff here and there.

Abbadon- his previous owner had painted him in Iron Warriors livery, which looked cool (at a distance) but was way too chunky. He also had huge eyes painted on, like he was running purely on coffee.. Not sure yet what scheme to run with, initial thoughts are the traditional GW black scheme but maybe throw some thinned purple washes in there to give a sinister aspect to the highlights... looking forward to doing all the skulls and small details on him.

Azrael- My original chapter master from 1994 will finally be repainted to lead my Dark Angels- whilst I have another metal Azrael and helmet bearer mini at hand, i'd prefer to use this actual mini as he's the one that's led me to victory countless times before. Although his plasma gun arm is missing in the pics, its now been located. Im still very proud of this original paintjob, it was done with unthinned old-skool GW paints, the equivalent of a standard brush and with the talent available to a young 14 year-old version of me.

Asmodai- the interrogator chaplain is in dire need of a repaint, I cant wait to get him back out cracking skulls- even if its with his confusing double power-weapon loadout that makes no sense (in this edition at least- in second ed a sword could be used to 'parry').

The Mystery Guest (?)- I found a 2nd edition model recently that I just couldnt pass up, he's being done up to test a few techniques and for another reason that I wont divulge just yet. Suffice to say, very keen to get him done!

So even though I have less than 70 days until my baby is due, I've got a lot of work ahead- at bare minimum I want Abbadon, Pedro and the Mystery Guest done, the other guys being less of a rush. Will I get them done? I'll make sure to get progress pics up as they come- they're all about to come out of their bath for a rinse! In the meantime, here's two of the minis who will be getting some work- the "before" shots if you will :)

Urgh!!! I think we can do something with this... Pedro needs love... i think glowing powerfist fingers and eyes will fit the bill nicely, and a "Tempest" spin on the GW Crimson Fists paint scheme ;)


Not bad for something painted 18 years ago!! I owe you a new lease on life my Supreme Grand Master... especially with the rumoured DA Codex inbound! 


Thats all for now, im hoping to get something up again soon.

Cheers,
Tempest