Thursday, March 29, 2012

Persistence pays off

Welcome back for another update!

I've been steadily plugging away at both my Deathskulls and Dark Angels for the last couple of weeks, getting between half and hour and three hours painting in most evenings, and its really paying dividends. I've now got 10 Boyz painted up to a nice standard (see previous posts), and have completed all the basic green power armour on my two Tactical squads and one Devastator squad. Its hard to see at the start of a painting task exactly how you will make it to the end- the job in front of you can look insurmountable, but with discipline any job can be completed. And so it is with all these previously untouched minis that they are now starting to come along really well!

So for the Orks thats 10 from 60 boyz done- exactly 1/6th, or a third of a full mob. Its taken a bit longer than expected, as I think my initial "45 mins to an hour" projection per boy was at the very least highly optimistic. The extended paint time come from me now using four different browns for the clothing and straps and three washes for the skin, being Devlan and Gryphonne all over, then Badab applied into the deepest recesses of the face and arm muscles. I couldnt be happier with the result I have a really good rich green skin tone going on, the colours all over the orks interact well and they all have random armour plating damage and checks/dags in blue and white. And, to be honest i'm getting quicker at painting, and finding new techniques and colour/wash combos that speed things up. The three boys in the picture above are part of the first batch of ten (which includes a nob and big shoota boy)

Just to show you how overkill I've gone, here's the selection of paints i'm using for the boyz mob (and will use on the rest of the army as well), and I'm even missing Gryphonne Sepia from the shot as well.... so its easily 20+ colours, but im 'only' (ha!) using about 12-13 per mini so they maintain a random colouring.

Speaking of which, im enjoying the yellows, reds, oranges and other 'spot' colours that draw the eye, they contrast nicely with the blue/white panoply on the rest of the armour, and realyl brings out that "looted" look to show that the lads will steal anything that isnt nailed down! Hoping to go a bit further with the Kans, Vehicles and the Stompa, with some partial Imperial insignia showing on larger plates of sheet metal to show that they've been looted to effect battle repairs.

Will try to get some progress pics up of the Dark Angel Squads, although they still aren't much to look at just yet- dark green and  black power armoured marines!

Next up: things are going to get a little bit 'Epic'!! Yep, we are going to go small small small scale!

Until then, cheers!
Tempest :) 

Tuesday, March 13, 2012

Abbadon: The Resurrection, and Ork Boyz paint scheme

Abbadon Returns!

Prior to our last weekend's 4K per side stoush at Adam's place I was required to remove Abbadon from the murky green bath of Simple Green concentrate that he's been living in for a while now, so that Ash could use him to lead his army. With him pulled out it could be seen that his old paintjob was lifting off everywhere, just what we want! I then placed him in a rigid plastic container, grabbed my garden hose and set the nozzle to 'jet'- a really sharp narrow high pressure stream of water (can bruise skin at close range), and blasted the Despoiler for about a minute. I think the following picture shows the results best- back to base metal :)


The slight "grey textured" look was just discolouration of the metal, its all smooth and even and hadn't done anything to the details at all. I then submerged Abbadon in a jar of straight tap water for an hour, emptied it and then gave him another hit with the jet. This wasnt to remove any more paint- it was already completely gone- but to remove any remaining traces of Simple Green. With this concluded i left him out in the sun for an hour, then brought him inside and reassembled him and when he was at room temp I re-undercoated him with 3 nice thin coats of Chaos Black undercoat spray. He then hit the tabletop the very next day and celebrated by carving his way through numerous Imperial Guard and Space Wolves squads and even destroyed a Land Raider Redeemer. Bat rep coming on that one really soon!

So in summary I'm very happy with how well he came up, Pedro Kantor is next on the cleanup list and should return the same results- his paint appears even more loose, I think the majority will just peel off all in one go!

Waaaagh!!! Paintjob now decided for the boyz
Sat down last night with the normal tuesday night animated show marathon on 7 Mate and decided to pull my finger out and work out a scheme for the 60 Ork boys I have. As always, this was preceded by a huge amount of google searching to see what others have done, what colour combos work and what id need to buy. Thankfully I was able to settle on a scheme that I have all the paints for, looks good and is easy to paint (within reason- I do tend to make things hard for myself). So behold, a not-so-good photo of what I came up with (i'll try to get a better pic later), this is actually a lot darker than the mini looks- all the colours are muted looking where in real life they are lot richer.


The main basis for the scheme is several differing shades of brown for the fatigues, pants, boots and straps that hold the armour on. The armour plating, guns, choppa blade and haft, rivets, buckles and boot toecaps are all boltgun metal. And the skin is Knarloc Green with a liberal Thraka Green wash, with a Devlan mud wash in the deepest arm muscle and face features recesses, then Knarloc Green reapplied on the raised areas and a final thinned highlight of camo green.

Everything gets a Devlan mud wash to shade and tie the colours together, especially the creases on the pants. A great tip to remember when using large all over thick washes is to hang the model upside down, this way the washes pool up "under" the areas that should be shadowed naturally. I then go back over most of the areas that i've washed and reapply the base colour again on the most raised sections, and a thin highlight if appropriate.


The boyz will also have a bit of battle-damage on their armour plating as can be seen in the picture, with the blue/white paint giving way to a black undercoat which then gives way to the bare metal underneath- this is best represented on the choppa. I also gave the choppa blade some dried blood on its edge, this is just very watered down dark flesh applied in a random fashion.

The spot colours for the boyz will be randomly applied red, orange, purple, bright green here and there- hair, gun pieces, wrist or arm bandages, straps, belts or whatnot. Im also looking to add some fluffy flavour- pieces of armour, clothing or weaponry lifted from other clans, primarily the Evil Sunz, Blood Axes or Bad Moons, due to the different colours and patterns they have. I'm not going to bother with anything looted from the Goffs- i've got enough white checked stuff in my army already, and anything with black and white checks is mainly just going to look like I've left something unfinished!!

This initial paintup took about 1.5 hours when you factor out the drying time for the two washes, including umming and ahhing about what colours to use. Im fairly hopeful that the next bunch of boyz will only take 45 minutes to an hour tops to get to the same standard now that all the hard decisions have been made.        

So, I'm done for now- hope you liked this small update!

Cheers,
Tempest  

Monday, March 5, 2012

Modular Table update, and Burna Spam (mmm, spam...)

Table update!

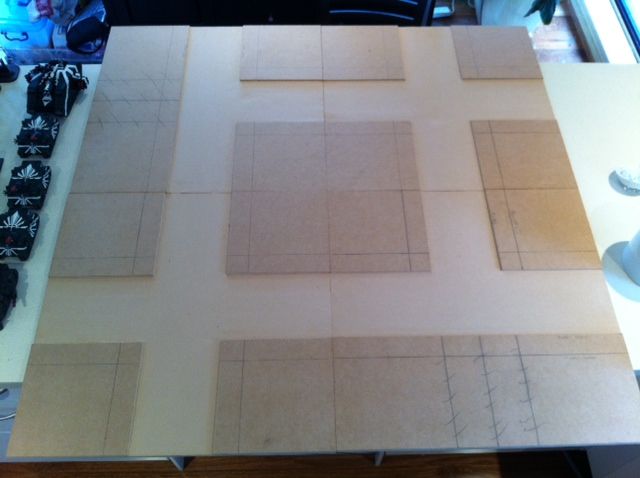
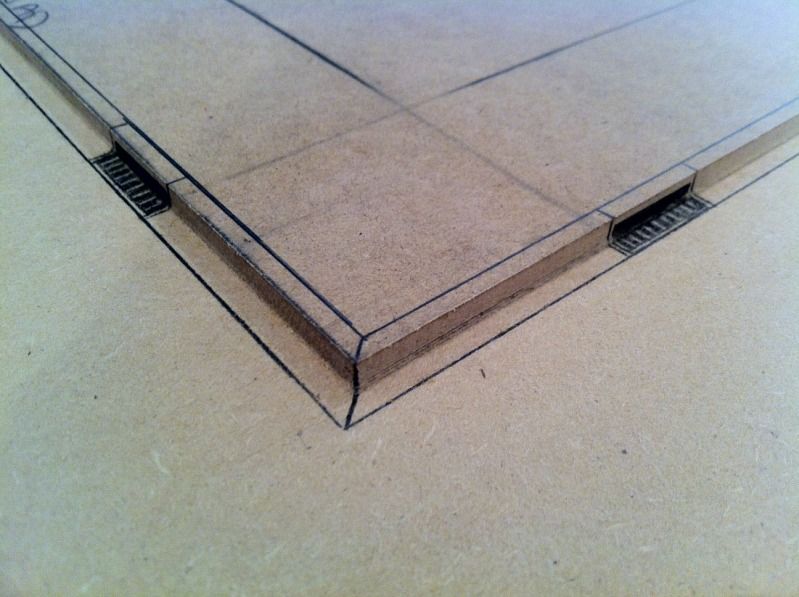
Just a quick update today to show the fruit of my labours, there is now 4 completed CoD boards all routed out and looking pretty. I've also decided that the level of detail on these boards should be fairly high, and to this end i've designed a simple 'gutters and drains' design to be drawn onto the boards with a Sharpie (ballpoint permanent marker), it really makes it look like a proper roadside edging!! Once the boards have been appropriately painted up (washed out grey over an undercoat of dirty red brown?) these will be drawn on. As my eventual plan is to spray the whole table assembly with a matte varnish they wont be wearing off in a hurry. This also makes me very keen to do some road markings as well for even more detail..


I've also had thoughts of sinking some fully or partially recessed pipes into some of the boards, running parralel to the road, to represent gas or power lines. I'd possible build some small relay boxes or metering valves positioned somewhere on the pipe (at one end maybe), giving yet more depth to the boards. As the boards are 16mm thick thats a lot to play with, and i'm going to integrate anything else I can think of that provides depth and flavour without being too overkill.

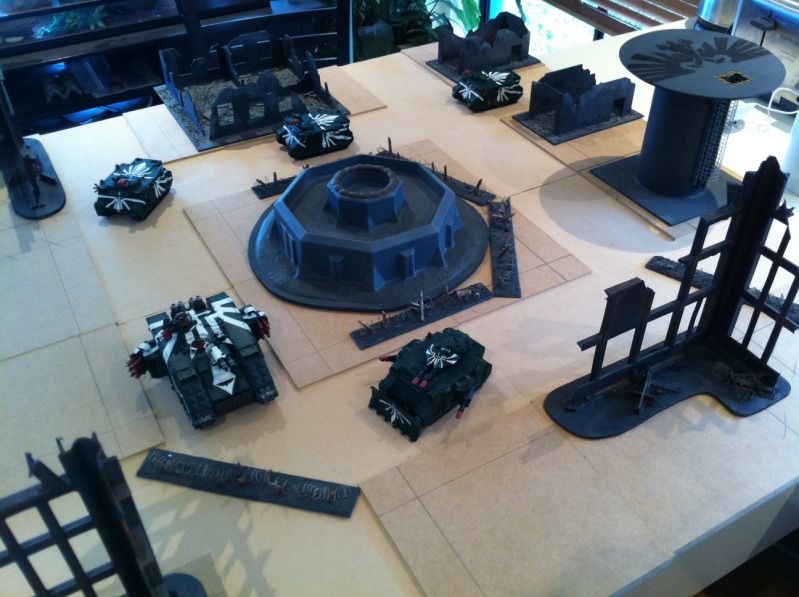
Here's some of my nicer terrain on the 4 routed boards to show the size and how it will work...


I've purchased and cut up another 4x2 board as well, but have run out of time for routing. Shouldnt be too long though and there'll be a full 6x4 board assembly ready to go!

More Orks! Burnas by the gutload....

So after my recent acquisition of a box of Lootas/Burnas I came to the realisation that my other recent purchases and chosen list build (Deathskull-fluffy Mekboy /Kan Wall) has filled all the Heavy Support slots with Killa Kans. So, in this instance the Lootas wouldnt have a home in my list for a while, being that the Kan Wall is still being tested out. However this did open up the prospect of running some Elite units, and this is why the Burna Boys were chosen as my next little mini project. So after a few more judicious pruchases on eBay i'm now the proud owner of 14 Burnas and a Mek with KMB!! Will eventually be 15, but I need to turn up another single Burna to purchase.

I'm hoping to use the boyz in a fairly bare bones open topped Battlewagon, and having read the rules for firing from open topped transports I can say that this unit is going to be one scary proposition- roll up on a target squad, and the flamer template can be shot out from any point on the hull. Not only that, but all shooting/templates can originate from the same point. What this means is that if I can cover the target unit with the flamer and get 6 hits, I then multiply that directly by the number of burnas I have. With a full 15 Burnas thats 90 hits at Strength 4!! I now know why people rate Burnas so highly, although I'm fully aware that like most specialised Ork units its a case of getting them into the right place at the right time- transports are a must  Im also very keen to see how they fare against tougher opponents using their 'cuttin flame' burna nozzles (power weapons), a full mob on the charge with WS 4 Strength 4 and dealing out 45 attacks will carve a lot of tough opponents up.

And the other reason why i'm doing a full sized mob of burnas? They look so cool! The gasmask heads, the fuel tanks and other paraphernalia, as well as the very Deathskull-esque ties that Burnas/Meks have from the fluff perspective, it all adds up to make for a great looking addition to my army. I'm hoping that my opponent will be distracted by all the other scary units in my army that i'll be able to get them and their Battlewagon across the table and within template range to deal some damage!

I'll get some pictures up once they are all assembled, hopefully sometime this week, as there's a game on with some mates this weekend.

Cheers,
Tempest